A few weeks ago, Google added the Team Units to the Drive. The truth is that they looked very good and I immediately tried them. After all this testing time, I have decided not to use them in the centre. In this article I explain the reasons.
Continue reading “Why don’t I use Google Drive Team Drives for the moment?”
Category: Administrators
G Suite Administration Console (2): Audits
Continuing with the series of articles on the Google apps for education admin console, today I review a very useful option that, because of the questions I receive, is not very well known. It’s about audits. The console lets you know what’s going on in many ways, always keeping your data private. Where’s a drive file? How many users have opened it? Who deleted an event from the shared calendar? And a lot of other things.
Continue reading “G Suite Administration Console (2): Audits”
G Suite Administration Console (1): Application presentation and installation
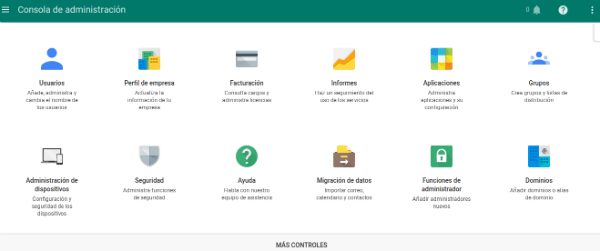
Following some queries I’ve received in the last few weeks, I start a series of articles by talking about the administration console of a Google apps for education. The truth is that it has a lot of possibilities and is worth investigating. I won’t do a complete tutorial because it would be endless and Google documentation is already quite good. I will only highlight a few aspects that I find particularly interesting and which, in some cases, are a little hidden.
Continue reading “G Suite Administration Console (1): Application presentation and installation”
Creating a Google Apps script
First, keep in mind that Google apps script is Javascript based. You don’t have to be an expert programmer, but you do have to master the syntax of the language. Therefore, if you don’t know the syntax of Javascript, I recommend you access the following link and perform the proposed activities. There are 16 modules that can be made in about 10 hours, but not all of them have to be made. The first 5 or 6 is enough. http://www.codecademy.com/tracks/javascript
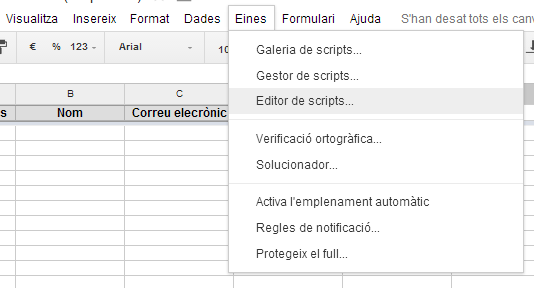
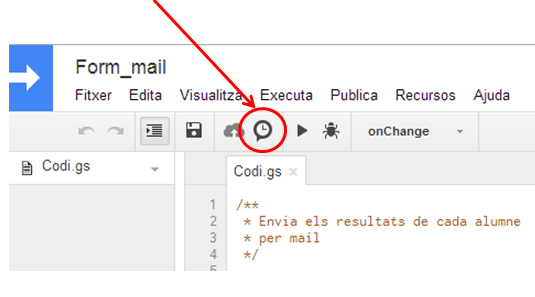
Once we know the syntax of Javscript, let’s focus on an example script. In this case, we will make a script to get a form to reach the respondent by email. On my centre’s website we have a form in case someone from the educational community wants to send a complaint or suggestion to the address. It is a form made with Google that only has 4 fields: Name and Surname / Mailing address / Course (only if you are a student or family) / Description of the complaint or suggestion. What the script I want to submit must do is send a copy of the answers to the person who answers the form. If you have a GAFE this can be done by forcing the user to log in, but in this case we want the form to be answered by people who are not in our GAFE (families, companies…). First, of course, you need to create the Google form and access the spreadsheet where the answers to the form will end up. Within this spreadsheet, we will access Tools / Script Editor
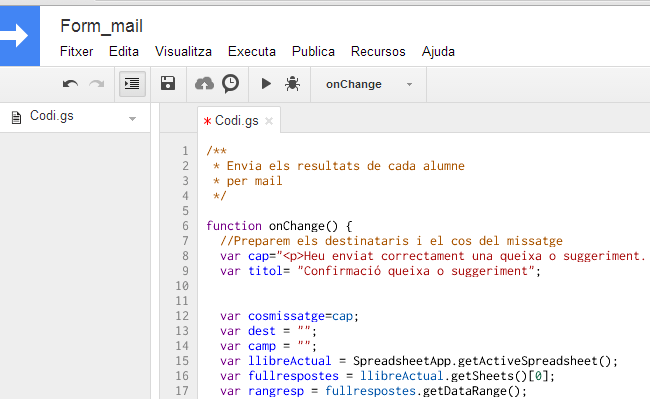
We’ll create a blank script and write the following code:
/**
* Send the answers by mail
*/

function onChange() {
//Prepar begin of mail
var cap="Se ha enviado su sugerencia o queja correctamente. A continuación se adjuntan sus respuestas:";
var asunto= "Confirmación queja o sugerencia";

var cuerpomensaje=cap;
var dest = "";
var camp = "";
var libroActual = SpreadsheetApp.getActiveSpreadsheet();
var hojaresp = libroActual.getSheets()[0];
var rangresp = hojaresp.getDataRange();
var ul_fila= rangresp.getNumRows();
var encontrado=0;
//Look at the last row in the answers sheet
for (j=1; j<rangresp.getNumColumns()+1;j++){
camp = rangresp.getCell(ul_fila,j).getValue();
for (i=0;i<camp.length;i++){ if (camp.charAt(i)==='@'){
encontrado=1;
}
}
if (encontrado===1){
dest=camp;
encontrado=0;
} else {
cuerpomensaje= cuerpomensaje+rangresp.getCell(1,j).getValue()+": "+camp+"";
}
}
//Mandamos el mail
GmailApp.sendEmail(dest, asunto, '',{ htmlBody: cuerpomensaje});
};
Let’s take a look at this code and see some interesting links to go deeper. The startup only serves to define variables (Mail subject to be sent / Mail header) and other programming variables. There are three specific ones to mention:
var libroActual = SpreadsheetApp.getActiveSpreadsheet();
var hojaresp = libroActual.getSheets()[0];
var rangresp = hojaresp.getDataRange();
To understand these variables, we’ll do very well with Google’s help. It is located in https://developers.google.com/apps-script/reference/spreadsheet/spreadsheet-app
They show us all the objects of Google applications and their properties. In the variables that I have defined in the script, the CurrentBook variable is an entire calculation book. Specifically the active book. The variable hojaresp, is the first spreadsheet of the book. The variable rangresp is a set of cells, all of which have data. We could have directly obtained the last variable, rangresp, by typing
var rangresp = SpreadsheetApp.getActiveSpreadsheet().getSheets()[0].getDataRange()
but that much at the outset might have been harder to understand. All scripts are based on this, objects and properties. With the help of Google, we can find anything from Google applications (cell values, email recipients, number of rows, text from a document…). Following the example,
var ul_fila= rangresp.getNumRows();
var encontrado=0;
//look at the last row of answers sheet
for (j=1; j<rangresp.getNumColumns()+1;j++){
camp = rangresp.getCell(ul_fila,j).getValue();
for (i=0;i<camp.length;i++){ if (camp.charAt(i)==='@'){
encontrado=1;
}
}
if (encontrado===1){
dest=camp;
encontrado=0;
} else {
cuerpomensaje= cuerpomensaje+rangresp.getCell(1,j).getValue()+": "+camp+"";
}
}
we looked at cell by cell in the back row. To do this, we define an ul_fila variable that is the number of rows in the range with data. The last one has the answer we want to send. We can look at the value of each cell by making a loop for, so we will look at all the cells. To access its value, we use the getCell (to set the cell) and getValue (to get the value) properties. Since we don’t know in which field the user will indicate the mail, what we do is to look at letter by letter if that cell has the @ symbol. To do this, we use a second for, which compares each letter with the @.
Now all that’s left is to create the body of the message, where we’ll put the name of the field (which is in the first row) and then the answer.
The script ends by sending the email
//Send mail
GmailApp.sendEmail(dest, asunto, '',{ htmlBody: cuerpomensaje});
To do this we use another Google object. It’s not spreadsheet, it’s mail. In another section of the Google help page we can find Gmail objects: https://developers.google.com/apps-script/reference/gmail/
Once we have made the script and understood how it works, we just need to program it to run every time someone answers the form. We’ll do it with the triggers.
We will configure the script we just created to run every time someone answers the form.
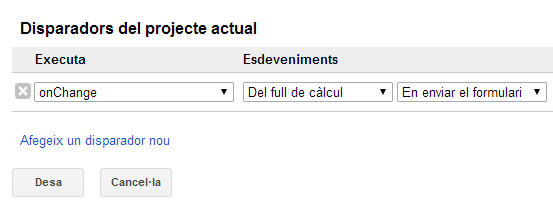
Here it is important which user is activating the trigger, since this will be the user sending the mail. If we are creating the script with a teacher user, but we want the mail to be sent to a center user, we must share the sheet with the center user in edit mode and let it trigger the trigger.
If you want to see how this script works in practice, then there is the link to a form below. If it is answered, I will receive a confirmation email from you.
I think that Google apps scripts are a great tool, as they can be useful for many operations (copy data between sheets, combine information from documentaries and spreadsheets and send it by email…). If you know something about programming it is not difficult to get into its way of working and you can do whatever you want. They are ideal for automating otherwise manual processes.
Use G Suite calendars to reserve classrooms and resources
The configuration process is not easy, but once the initial configuration is done, the subsequent use is simple.
Initial configuration
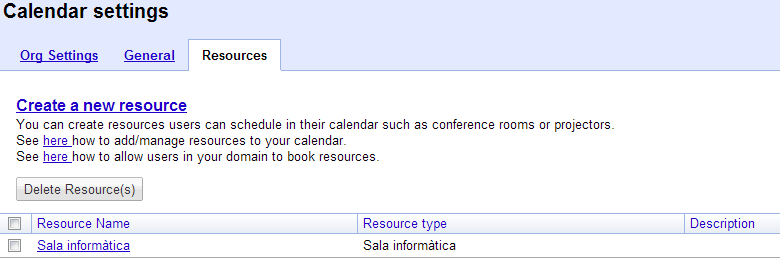
The G Suiet administrator must enter the control panel and access the calendar properties. There you will have the Resources tab where you can create a calendar for a resource. In the example, I have created a calendar for a computer classroom.
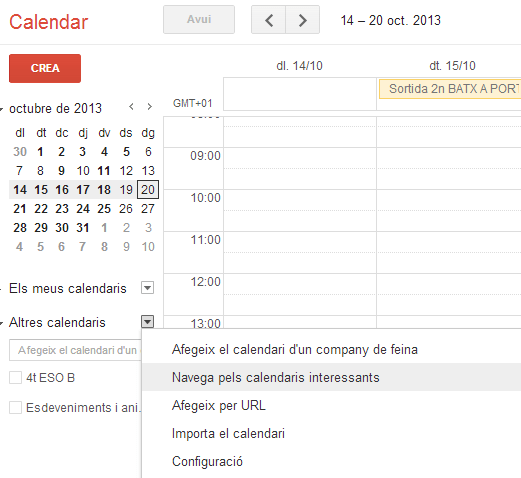
Once created, the administrator is the one who must share it. To do this, you must first find it, a task that will not be easy.
You must access your calendars and select the arrow to the right of Other calendars. And choose the Navigate interesting calendars option:
Now you must select the More tab and choose Interesting resources for domain name.
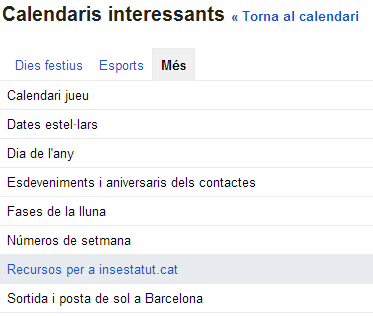
Finally, you will see the list of resource calendars you have created. All you have to do is subscribe. If you do, you’ll already have the calendar added to your calendars, just like a regular calendar. If there are times when the room is already occupied by regular classes, the administrator can add them in the usual way as events are added.
Now it’s time to share it with all the teachers at the school. It must be done in the same way as any other calendar and permission will be given to view all event information.
If teachers are shared with teachers one by one, they will be shown directly on their calendars in the Other calendars section. If it is shared with a Google group, teachers will need to follow the same procedure as the administrator to view it (navigate through the interesting calendars, tab more…), although it is not necessary for teachers to add the calendar in order to reserve resources.
So far the initial configuration.
Use of resource calendars
When a teacher wants to book a classroom, he or she must create an event on his or her calendar, on the day and time when he or she wants to make the reservation.
If you edit the event, on the right side you can choose the Rooms option. If the classroom is free at that time, you can select it and when you save the event will be reserved.

If the classroom was already booked by another teacher, the classroom would not appear.
As I said, using the calendar is very simple, although teacher training will be necessary. But it’s worth it, because I think it’s important to have the management tools centralized in the same platform. It simplifies things for teachers.


