 Català (Catalan)
  Español (Spanish)
After the first article explaining a little about what web apps made with Google Apps Script (GAS) are, we are going to see in this second article how to create a simple one. And I will do it with a real example, related to the evaluation of students. I warn you that this article will be much more technical and that you will need knowledge of GAS, html, css styles and javascript. As my friends from the GEG Spain coordinators group say, it will be in “whale” language.
We will create an application for students to fill in a KPSI (Knowledge and Prior Study Inventory) when they start a unit or project and fill it in again when they finish it. For those of you who are not familiar with the KPSI instrument, it is nothing more than a set of questions about the topic, where students do not have to give the answer, but must indicate whether they know the answer. It serves as a way to be aware of prior knowledge and to make the student aware of the progress he/she has made at the end of the test.
To make it easier to follow, in this folder you can find the final files, both the spreadsheet and the script with the code and the html files.
We will make an application for students to answer the following 4-question KPSI.

To start with, let’s create a spreadsheet (without any script) in order to save the data. The spreadsheet could look like the following (it can be found in the folder):

Next, let’s create a script (this script is always created on my drive, but can be moved to any folder we want).

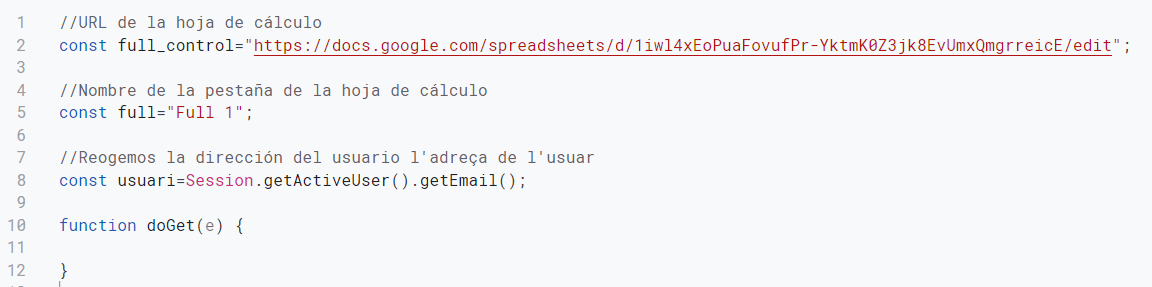
The script will start with some constant variable definitions, the address of the sheet, the name of the sheets and the address of the user, and, for the moment, it will have only one function, the doGet function.
As I said in the previous article, to create web apps you need to know GAS, html, css and javascript. So I won’t spend too much time explaining each function, otherwise this would be a complete course rather than an article.
The doGet function is the only one that can serve html pages in web apps. Therefore, it is in this function where we will put the code. At the start, we will collect all the data in the spreadsheet. We check that the user who answers is in the list of students.
//URL de la hoja de cálculo
const full_control="https://docs.google.com/spreadsheets/d/1iwl4xEoPuaFovufPr-YktmK0Z3jk8EvUmxQmgrreicE/edit";
//Nombre de la pestaña de la hoja de cálculo
const full="Hoja 1";
//Reogemos la dirección del usuario l'adreça de l'usuar
const usuari=Session.getActiveUser().getEmail();
function doGet(e) {
//Comprobamos si el usuario está en la lista de alumnos
var spreadsheet = SpreadsheetApp.openByUrl(full_control);
var sheet = spreadsheet.getSheetByName(full);
var rang = sheet.getDataRange();
var alumnes = rang.getValues();
var numRows = rang.getNumRows();
let identificacio=0;
for (let i=1;i<numRows;i++){
if (alumnes[i][1]==usuari){
identificacio=1;
}
}
//Si el alumno no está en la llista, se indica con un mensaje emergente
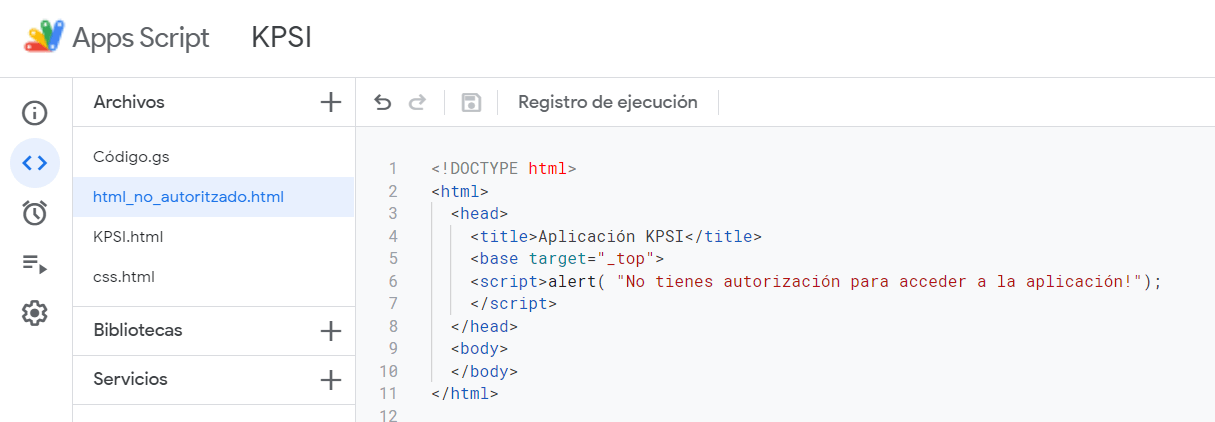
if (identificacio==0){
return HtmlService.createHtmlOutputFromFile('html_no_autoritzado').setTitle("Aplicación KPSI")
}else{
}
In case the user is not in the list, we return an html. This html must be created in the script. In the code I have put, I have called it html_no_authoritzado.
Although the application will be public on our domain (for those who know the URL), we have already made sure that only our students can use the application.
Now we have to fill in the other part of the if, the else. If the user is one of our students, we will show him/her the html page to fill in. We will call this page KPSI.html
//Si el alumno no está en la llista, se indica con un mensaje emergente
if (identificacio==0){
  return HtmlService.createHtmlOutputFromFile('html_no_autoritzado').setTitle("Aplicación KPSI")
}else{
  //Abrimos la pantalla de la aplicación, pasando los parámetros necesarios
  plantilla=HtmlService.createTemplateFromFile('KPSI');
  plantilla.usuari=usuari;
  plantilla.alumnes=alumnes;
  return plantilla.evaluate().setTitle("Aplicación KPSI")
}
Unlike when the user was not a student, when we used createHtmlOutputFromFile to display the html page, we now use createTemplateFromFile, which allows us to pass parameters. When the user is not a student, it is enough to display a message. Now, we have to show a header with the student’s email and, if he/she has already answered the KPSI, we have to show his/her previous answers. To do this, the user and the content of Sheet 1 must be passed as parameters.
Let’s go now to the content of the KPSI page. We will start with two references within the header
<html>
<head>
<title>Aplicación KPSI</title>
<base target="_top">
<link href="https://cdn.jsdelivr.net/npm/bootstrap@5.0.2/dist/css/bootstrap.min.css" rel="stylesheet" integrity="sha384-EVSTQN3/azprG1Anm3QDgpJLIm9Nao0Yz1ztcQTwFspd3yD65VohhpuuCOmLASjC" crossorigin="anonymous">
<?!= include('css.html'); ?>
The first one (<link href = “https://cdn.jsdelivr.net/npm/bootstrap@5.0.2/dist/css/bootstrap.min.css” …) is to be able to use bootstrap styles to shape our page. It could be done by creating all the css ourselves, but it would be more complicated to make it adaptable to different screen sizes. If you don’t know the bootstrap classes, you can find the documentation in this link.
The second one (<?! = Include ( ‘css.html’);?>) allows us to have our own stylesheet. We will have to create another html with the name css and put our styles.
<style>
  div.cap
  {
    color:#ffffff;
    background-color: gray;
  }
  div.titol{
    font-weight: bold;
    font-size: 1.4em;
    height: 50px;
  }
</style>
function include(filename) {
  return HtmlService.createHtmlOutputFromFile(filename)
      .getContent();
}
But let’s not get distracted and continue with the KPSI.html page. Once the references are indicated in the head, we define a header inside the body. Taking advantage of bootstrap styles, we can create a grid as a background and place the fields where we want (in rows and columns). In addition, we add custom css to give the look we want (such as div “cap” and div “titol”, which are defined in the css.html).
<html>
 <head>
  <title>KPSI</title>
  <base target="_top">
  <link href="https://cdn.jsdelivr.net/npm/bootstrap@5.0.2/dist/css/bootstrap.min.css" rel="stylesheet" integrity="sha384-EVSTQN3/azprG1Anm3QDgpJLIm9Nao0Yz1ztcQTwFspd3yD65VohhpuuCOmLASjC" crossorigin="anonymous">
  <?!= include('css.html'); ?>
 </head>
 <body>
  <div class="container">
   <div class="row cap">
    <div class="col titol">
      Aplicació KPSI
    </div>
    <div class="col-2">
      Mail del alumno: <?= usuari ?>
    </div>
   </div>
  <div>
 </body>
</html>
Notice that we have already made one of the parameters we have passed appear, the student’s email address. We simply indicate that it is javascript code with the symbols <? ?>.
But let’s test that what we are doing works. If we have created all the files (html_unauthorised, KPSI and css), we use the Implement button and choose the New implementation option.
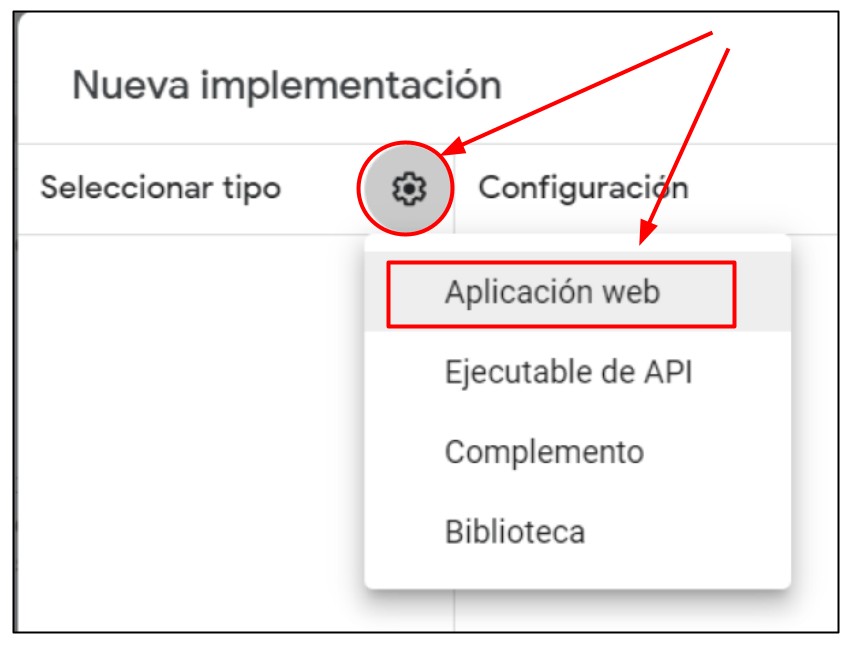
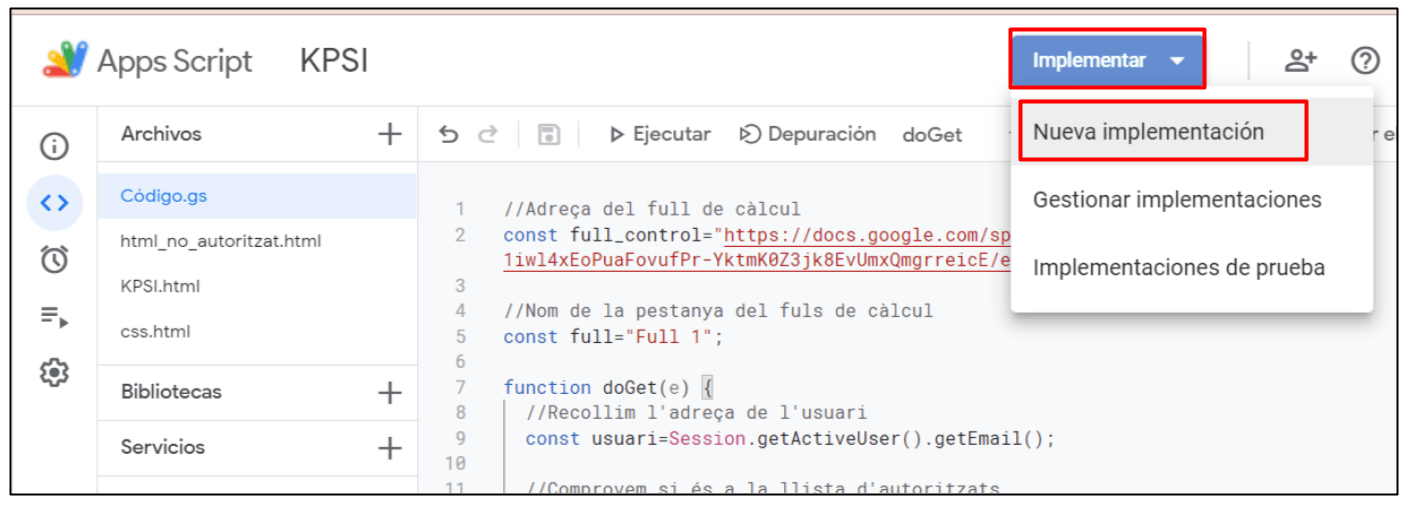 We choose the type to be Web Application.
We indicate a description (such as the version number), that we are the ones who run the application (we are the only ones who have access to the spreadsheet) and that it has access to any user of our domain (since we already control by code that it is a student).
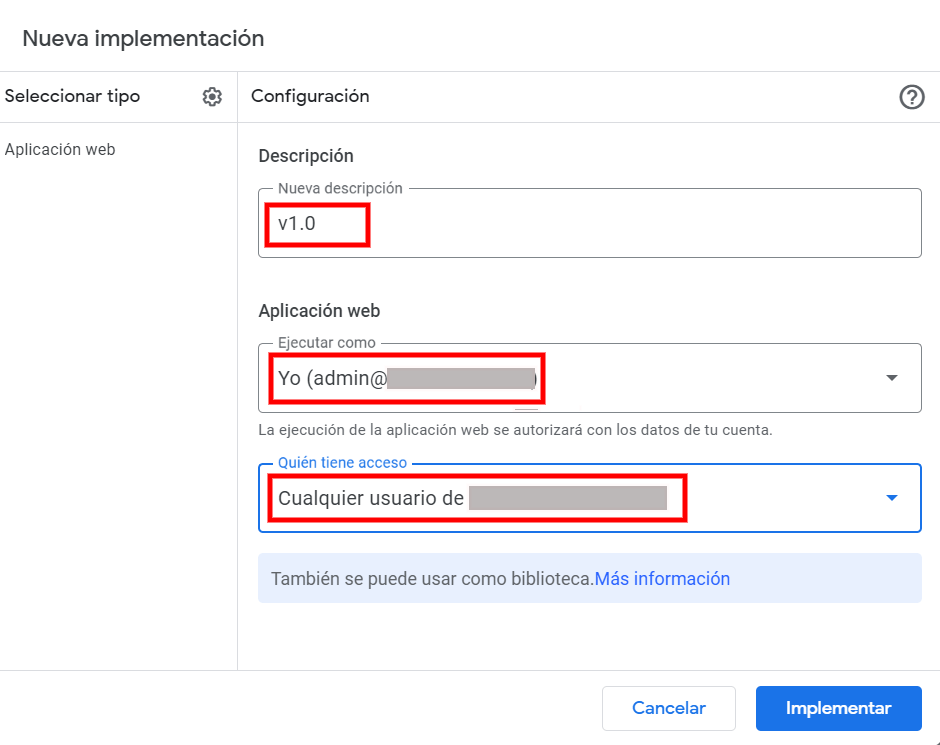
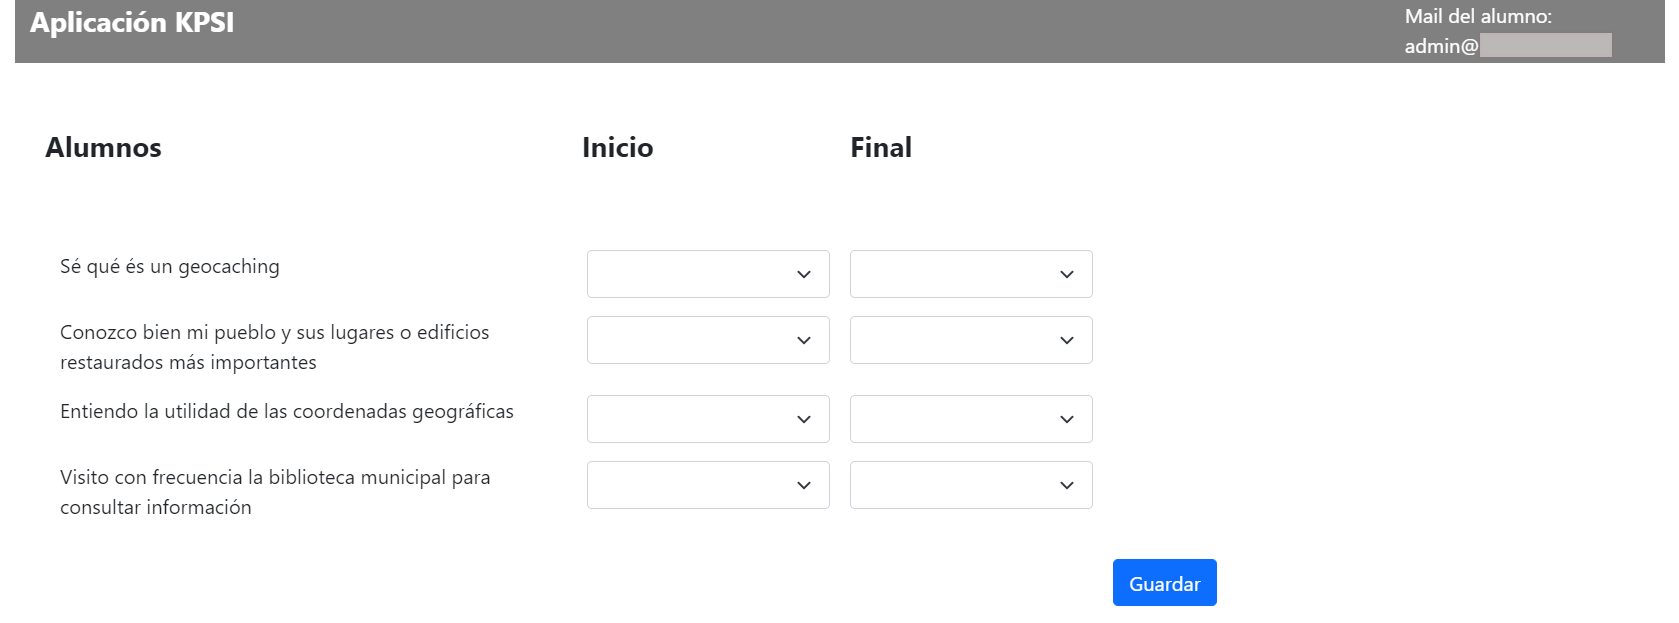
Like all scripts, a screen will appear asking for access and we will have to grant permissions to the script. Once permissions have been granted, the address will appear for testing. If the address of our user is one of those listed in the spreadsheet, the following screen will appear.

The background colour can easily be changed with our css. If we make changes to the code and want to test it again, instead of using the new implementation option, it is much better to use the test implementations option. Once we have done all the tests, we will do a new Implementation again to get the final address for the students to use.
Now we have to continue working with the KPSI page so that the four questions that the students have to answer and the drop-downs appear. I assume that you know html and javascript, so I’ll put the code and comment on the most important things.
<html>
 <head>
  <title>Apliación KPSI</title>
  <base target="_top">
  <link href="https://cdn.jsdelivr.net/npm/bootstrap@5.0.2/dist/css/bootstrap.min.css" rel="stylesheet" integrity="sha384-EVSTQN3/azprG1Anm3QDgpJLIm9Nao0Yz1ztcQTwFspd3yD65VohhpuuCOmLASjC" crossorigin="anonymous">
  <?!= include('css.html'); ?>
 </head>
 <script>
  function habilitar(){
   //Al cambiar algun valor, se habilita el botón guardar
   document.KPSI.btn_desar.disabled=false;
  }
  function guardar(){
   google.script.run.guardar(document.forms["KPSI"]);  //ejecuta la función guardar del código
   document.KPSI.btn_desar.disabled=true; //Deshabilitamos el botón
   window.alert("Se han guardao los cambos correctamente"); //mostrar un mensage indicando que se ha guardado
  }
 </script>
 <body>
  <div class="container">
   <div class="row cap">
    <div class="col titol">
     Aplicación KPSI
    </div>
   <div class="col-2">
    Mail del alumno: <?= usuari ?>
   </div>
  </div>
 <div>
 <div class="container separador"></div>
 <div class="container">
  <div class="row g-3">
  <div class="col-md-4 titol">
   Alumnos
  </div>
  <div class="col-md-2 titol">
   Inicio
  </div>
  <div class="col-md-2 titol">
   Final
  </div>
 </div>
 <div class="container separador"></div>
 <div class="container">
  <form name="KPSI" id="KPSI" action="javascript:;">
   <? for (let i=2;i<alumnes.length;i++){ //Miramos en qué fila de la hoja de cálculo están los datos del alumno que accede
    if (alumnes[i][1]==usuari){
     var fila=i;
    }
   }

   for (let i=2;i<alumnes[0].length;i=i+2){ ?>
    <div class="row g-3">
    <div class="col-md-4">
     <label for="curs_grup"><?= alumnes[0][i]?></label>
    </div>
    <div class="col-md-2">
     <select class="form-select" name="inici[]" onchange="habilitar()">
      <option value=""></option>
      <option value="1" <? if (alumnes[fila][i]==1){ ?>selected<? } ?>>No lo sé</option>
      <option value="2" <? if (alumnes[fila][i]==2){ ?>selected<? } ?>>No lo entiendo</option>
      <option value="3" <? if (alumnes[fila][i]==3){ ?>selected<? } ?>>Creo que sí que lo sé</option>
      <option value="4" <? if (alumnes[fila][i]==4){ ?>selected<? } ?>>Lo podría explicar a mis compañeros/as sin dificultad</option>
     </select>
    </div>
   <div class="col-md-2">
    <select class="form-select" name="final[]" onchange="habilitar()">
     <option value=""></option>
     <option value="1" <? if (alumnes[fila][i]==1){ ?>selected<? } ?>>No lo sé</option>
     <option value="2" <? if (alumnes[fila][i]==2){ ?>selected<? } ?>>No lo entiendo</option>
     <option value="3" <? if (alumnes[fila][i]==3){ ?>selected<? } ?>>Creo que sí que lo sé</option>
     <option value="4" <? if (alumnes[fila][i]==4){ ?>selected<? } ?>>Lo podría explicar a mis compañeros/as sin dificultad</option>
   </select>
  </div>
 </div>
 <div class="container separador2"></div>
 <? } ?>
</div>
<div class="container separador2"></div>
<div class="container">
  <div class="row g-3">
   <div class="col-md-4"></div>
   <div class="col-md-4"></div>
    <input type="text" class="form-control" value="<?= fila ?>" id="fila" name="fila" hidden>
   <div class="col-md-2"><button class="btn btn-primary" name="btn_desar" id="btn_desar" disabled onclick="guardar()">Guardar</button></div>
 </div>
</body>
</html>
Basically, we have added a form and, with the for instruction, as many questions as have been indicated in the spreadsheet. As in the spreadsheet we have combined columns to be able to have the answers at the beginning and at the end together, we do the for with an increment of 2 of i (i = i + 2).
Before, we looked at which row the user’s data was in so that we could show his previous answers, if he had done so. In order not to recalculate it later, we have added a hidden field in the form with this row number. Then we can pass it to the code to use it.
In addition, we have added a couple of javascript functions. One in the select, onChange, so that the save button is only activated when a change is made.
The second function, save, which is activated when the button is pressed, onclick, is the one that will return us to the code sheet, passing as parameters all the values that have been entered in the dropdowns. the function is very simple:
google.script.run.guardar(document.forms["KPSI"]);  //ejecuta la función guardar del código
window.alert("Se han guardao los cambios correctamente"); //mostrar un mensage indicando que se ha guardado
What is missing? Define the save function in the code. This is the function that will save the data in the spreadsheet.
function guardar(KPSI){
 //Recuperamos los valores del formulario
 var inici=KPSI["inici[]"];
 var final=KPSI["final[]"];
 var fila=parseInt(KPSI["fila"]);

 //Creamos una matriz con los valores inicio y final intercalados, igual que en la hoja de cálculo
 var valors=[];
 valors[0]=[];
 let j=0;
 for (let i=0; i<(inici.length+final.length);i=i+2){
  valors[0][i]=inici[j];
  valors[0][i+1]=final[j];
  j++;
 }
 //Guardoamos los valores en la hoja de cálculo
 var spreadsheet = SpreadsheetApp.openByUrl(full_control);
 var sheet = spreadsheet.getSheetByName(full);
 sheet.getRange(fila+1,3,1,valors[0].length).setValues(valors);
}
And now we have reached the end. We have created a small web application where students log in, see the previous answers and can modify them.
It would look like this.
To polish it up, it would be good to check when students can change the answers. It doesn’t make much sense that at the end of the unit they can change the answers from the beginning. We could add a checkbox in the spreadsheet to say if the possibility of students’ answers is activated for the start column and another one for the end column. We would take this value and in the selects we would add a conditional. If it is not allowed, in the html code I would add disable. Something like this:
<select class = “form-select” name = “start []” onChange = “enable ()” <? if (allowed_start == false) {?> disabled <? }?>
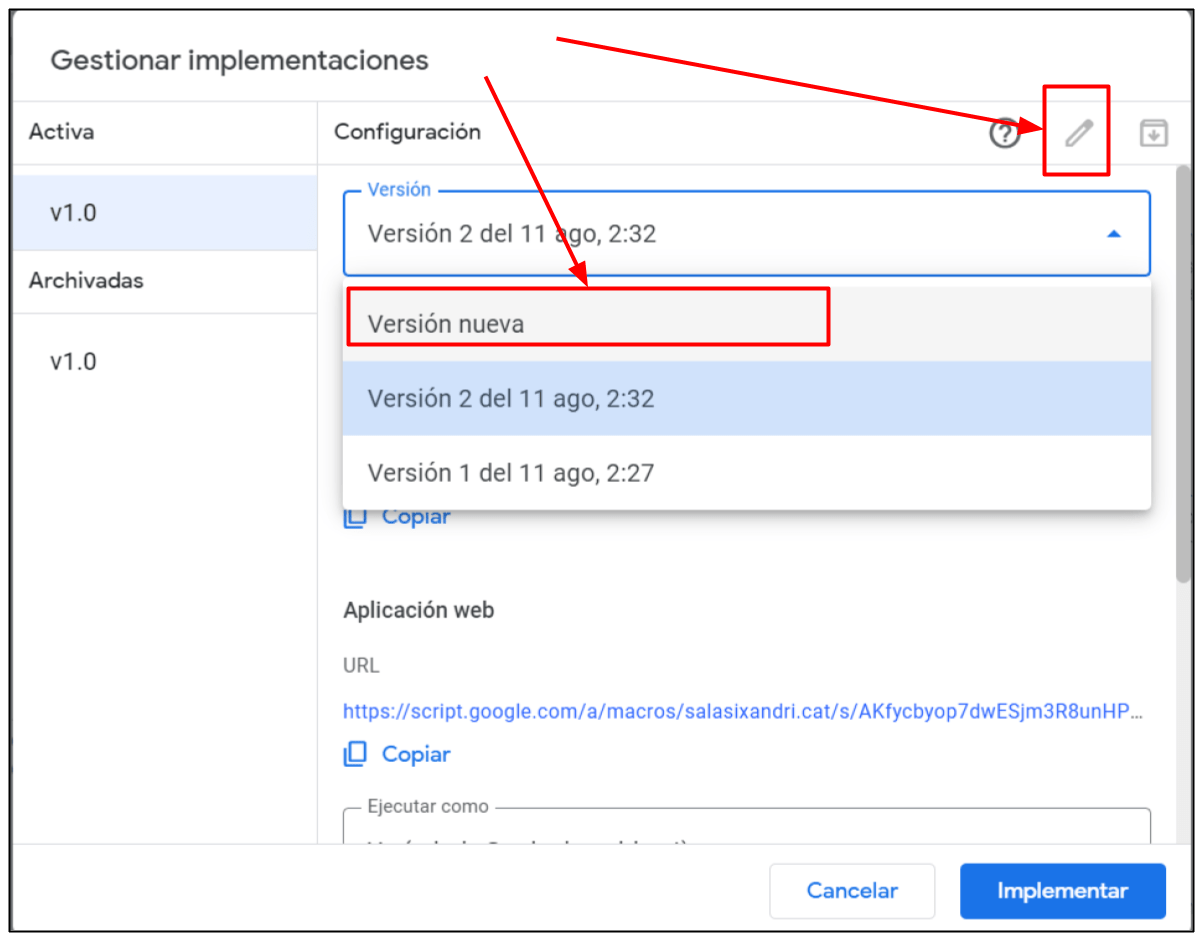
But I’ll leave that to you. Once the script is finished and tested, you should implement it again. Note that if you make a new implementation, the URL changes. If you have already sent the URL to the students, it will be quite problematic, as the students will make a mess of it. If you want to make a new implementation without the URL changing, instead of using the new implementation option, you should use the Manage implementations option, edit the version and choose new version. This way, the implementation does not change and therefore the URL does not change either.
I hope the article has been sufficiently comprehensive and that you can see how to create Web apps with Google apps script. I leave a 3rd part to explain how to work with different screens. As I said at the beginning, the only function that can display html is the doGet function. For example, the save function that we have created, cannot display any html page. Therefore, to make applications where we want more than one screen (pressing a button to display a different screen), we will have to do some tricks. I’ll tell you about it in the next article, which will be shorter and will close the trilogy.
