 Català (Catalan)
  Español (Spanish)
With this article, I finish the trilogy on web apps with Google apps script. In the first article we saw what they were and what we could develop. In the second, we saw the process of creating a specific web app. In this third one, we will see how we can make a web app that has several html pages.
As we said in the second article, only the doGet function can return html. In fact, when the URL of the application is accessed, the doGet function is executed, which is the one that returns the html. This html usually has a button that calls another function that saves data or triggers actions. But what if we want the application to have more than one screen? How do we do it with a single doGet function?
Let’s continue with the example of the second article, where we created a KPSI form that the students would answer at the beginning and at the end of a unit. Let’s suppose that the same application should be used to answer 3 KPSI forms corresponding to 3 different units. How could we do it? (You can find the final script in this link)
The logical thing would be for the application to have 3 buttons, one for each unit. Depending on which button the student clicks, he/she should see and fill in one KPSI questionnaire or another.
To do this, we will use the parameter of the doGet function (e). This e contains the parameters that are passed with the URL. For example, if the address of the function implementation is https://script.google.com/a/macros/s/AKbgx7vR1t/exec, if we call the function with the following URL https://script.google. as/a/macros/s/AKbgx7vR1t/ejec?p=1 we can retrieve the value of p through the y parameter of the doGet (e) function.
In the doGet function, we add the code to collect the parameter:
function doGet(e) {
 //Recogemos los parámetros (pantalla)
 let params= e.parameter;
 let pantalla=params.p;

(...)

}
In this way, we can decide which screen is displayed with this function. By adding the switch expression, we can now make it show one html page or another. We pick up the parameter, make sure that the student is in the list, and display the html screen that corresponds according to the parameter sent through the URL (if no parameter is sent, we will assign screen 1).
function doGet(e) {
  //Recogemos los parámetros (pantalla)
  let params= e.parameter;
  let pantalla=params.p;
  if (pantalla==undefined) { pantalla=1 }; //Si la llamada a la aplicación no tiene ningún paràmetre p, le asignamos la primera pantalla
  //Comprobamos si el usuario está en la lista de alumnos
  var spreadsheet = SpreadsheetApp.openByUrl(full_control);
  var sheet = spreadsheet.getSheetByName(full);
  var rang = sheet.getDataRange();
  var alumnes = rang.getValues();
  var numRows = rang.getNumRows();
  let identificacio=0;
  for (let i=1;i<numRows;i++){
    if (alumnes[i][1]==usuari){
      identificacio=1;
    }
  }
  //Si el alumno no está en la llista, se indica con un mensaje emergente
  if (identificacio==0){
    return HtmlService.createHtmlOutputFromFile('html_no_autoritzado').setTitle("Aplicación KPSI")
  }else{
    switch (pantalla) {
      case 1:
          plantilla=HtmlService.createTemplateFromFile('KPSI');
          plantilla.usuari=usuari;
          plantilla.alumnes=alumnes;
          plantilla.apli=apli;
          return plantilla.evaluate().setTitle("Aplicación KPSI")
          break;
        case 2:
          plantilla=HtmlService.createTemplateFromFile('KPSI2');
          plantilla.usuari=usuari;
          plantilla.alumnes=alumnes;
          plantilla.apli=apli;
          return plantilla.evaluate().setTitle("Aplicación KPSI")
          break;
      case 3:
          plantilla=HtmlService.createTemplateFromFile('KPSI3');
          plantilla.usuari=usuari;
          plantilla.alumnes=alumnes;
          plantilla.apli=apli;
          return plantilla.evaluate().setTitle("Aplicación KPSI")
    }
  }
}
If we create the pages KPSI2.html and KPSI3.html, the same application already loads one or the other according to the URL parameter.
However, we still need to add the buttons to the KPSI, KPSI2 and KPSI3 pages. We will do it only for the KPSI, as it will be the same for the others. The idea is to make the URL of the application with the corresponding parameter open when you click on it. Before going to the KPSI page, in the code, we will have to find this address of the application and pass it as a parameter.
Therefore, as a constant in the code, we will add.
//Comentar en publicar la versión. Eliminar comentar para las pruebas
const apli="https://script.google.com/a/macros/s/AKfycbzEpglhjqn8FKi6DXjJydP8CB6wFvszyFqb05czYUc/dev";

//Comentar cuando se realizan pruebas y no se publica. Eliminar comentar para publicar.
//const apli=ScriptApp.getService().getUrl();
As you can see, we define two addresses. One for the tests, which address ends in / dev and one for the final implementations, which we get automatically with the ScriptApp’s getUrl. While we are working with the test implementation, we will comment out the ScriptApp line. When we have already created the implementation for the students, we will comment out the / dev address line.
Now we also pass this apli variable as a parameter and go to the KPSI page.
We see how it would look like in the KPSI page. After the header and before the students, we would add:
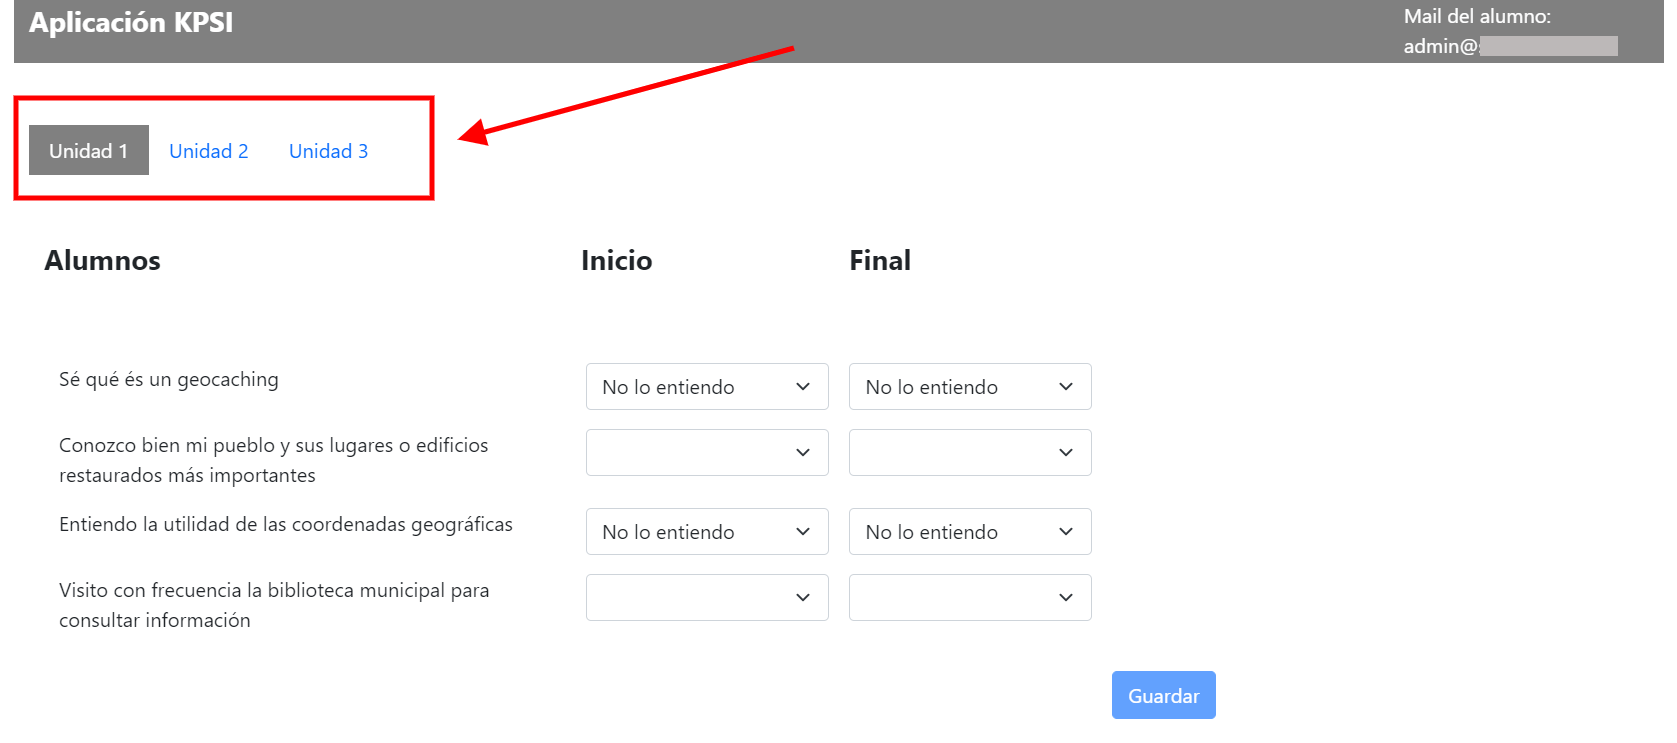
<ul class="nav">
 <li class="nav-item">
   <a class="nav-link active" onclick="saltar(1,<?=apli ?>)" href="javascript:;">Unitat 1</a>
 </li>
 <li class="nav-item">
   <a class="nav-link" onclick="saltar(2,<?=apli ?>)" href="javascript:;">Unitat 2</a>
 </li>
 <li class="nav-item">
  <a class="nav-link" onclick="saltar(3,<?=apli ?>)" href="javascript:;">Unitat 3</a>
 </li>
</ul>
We see that the application has the three units to choose from (in this case, with unit 1 marked as active).
Now we only need to define in this KPSI page the function jump (), which is the one that will build the address of the application with the corresponding parameter.
function saltar(p, apli){
  if (document.KPSI.btn_desar.disabled==false){ //Si el botón está desactivado es porque ha realizado cambios y no ha guardado
    let resposta=window.confirm("Has hecho cambios y no has guardado. ¿Has olvidado guardar los cambios? Pulsa Aceptar para volver a la página y poder guardar o Cancelar para salir sin guardar");
    if (resposta==false) {
      window.open(apli+"?p="+p, "_top");
    }
  }else{
    window.open(apli+"?p="+p, "_top");
  }
}
As you can see in the code, we take the opportunity to check if the changes have been saved. If you want to change the screen without saving, a message appears warning you to save. In any case, the URL of the application is called by adding the parameter p=1 (or 2 or 3, depending on the Unit chosen). In this way, the doGet function is always called again, which is the one that displays the html page we want.
I admit that the system is not particularly comfortable and you have to be a bit careful not to make any mistakes, but it is not too complicated. It also has a side effect. If you insert the application, these jumps will not work. It can only work directly with the URL, without embedding in any site.
Now we would have to create the pages KPSI2 and KPSI3 and modify the function they call to save. We would define the functions save2 and save3 in the code and configure where we want to save the data from these other forms: in other tabs of the spreadsheet or in other workbooks.
I hope that with the series of 3 articles I have been able to give you the basics to be able to create web apps, always remembering the limitation of 30 concurrent users.
And what is the advantage of doing this procedure instead of creating an application with PHP? Basically 2. The first one, the ease of using Google APIs from GAS. Secondly, we don’t need to look for a server to host our application, it is already operative from Google’s servers.
