 Català (Catalan)
  Español (Spanish)
A few years ago I wrote an article explaining why I would not use the shared drives. After the latest changes that Google has made and which are spreading to all the G Suite for Education domains, I think that the time has come to use them to organize the centre’s documentation.
Basically, they have two advantages over a shared folder.
- The documents that are created or saved do not have an owner. Files belong to the shared drive. This avoids problems with teachers who leave the centre or who simply change responsibilities. We will be able to withdraw editing permission (and even reading permission) without any problem.
- There is a role, called Contributor, which allows you to read and add files, but does not allow you to delete them. This way we will avoid anyone deleting anything by mistake. Only Managers can delete files and folders.
And why didn’t you use them until now? Simply because of the management of the permits. Finally, Google has added the possibility of having different permissions on the folders and subfolders of a drive. Although this is no wonder, as it only allows you to add permissions (never reduce them), I think it’s enough to take advantage of it.
Organizing the drive correctly does not have a single option. On the contrary, each site can be organized very differently and all can work. I will now explain the way I think is most optimal.
Previous step: users and groups
For the organization I propose, it is necessary to have created users for the teaching staff (and for the administration staff if necessary). In addition, I strongly recommend that the positions (management, head of studies, coordinators, etc.) have a specific user. You also need to have groups created. The idea will be to share folders and subfolders only with groups and with specific positions. In this way, we will create the document structure, we will configure the permissions and it will not be necessary to change them any more. By managing specific groups and users, all users will see the documents they need. And you will not be able to modify what they do not need.
First step: deciding on the number of shared units
To make this decision we must be clear that all users we add to a shared drive will be able to see ALL files, folders and subfolders. We will be able to decide whether or not they can make modifications from one level of folders, but they will have read permission in all of them.
Therefore, it is possible that a single organizational unit is not enough. The management team may want to have private files and, therefore, it would be logical for them to have a separate Shared Drive. The same for other groups.
However, I am in favour of making non-confidential information available to all teachers. You never know when it will be interesting for them to see some document that, strictly speaking, is not related to what they normally develop.
In any case, I am sure that a school drive with basic documentation (project, regulations, projects, etc.) must be kept.
Second step: creating the shared Unit and defining the initial roles
I propose to create the Shared Centre Drive with a position user (management, administrator, etc.). Once created, all the position users and all the groups that will have permission must be added. You should avoid adding individual users (who are not in a position). Initially, all the position users and all the groups will be assigned the role of Reader.
Third step: create the folders and subfolders within the shared drive
There are many possible structures here. There are centres that do it by courses, centres that do it by subjects, centres that have been certified with the corresponding ISO standard and must have a specific structure, etc.

Logically, within each folder there will be more subfolders. And within the subfolders, more subfolders, etc. And inside the subfolders we will put the different files.
Fourth step: assigning permissions to each folder and subfolder
Now comes the heaviest and longest part, but which we will only do once. Once it is done, there is no need to change it any more. The management from the moment we have done it, will be adding and removing users from groups.
We must bear in mind how the permissions in the folders and subfolders of shared drives work. We have made all the groups and users in charge have a Reader role in the shared Unit. This means that they have read permission to all folders, subfolders and files on the drive.
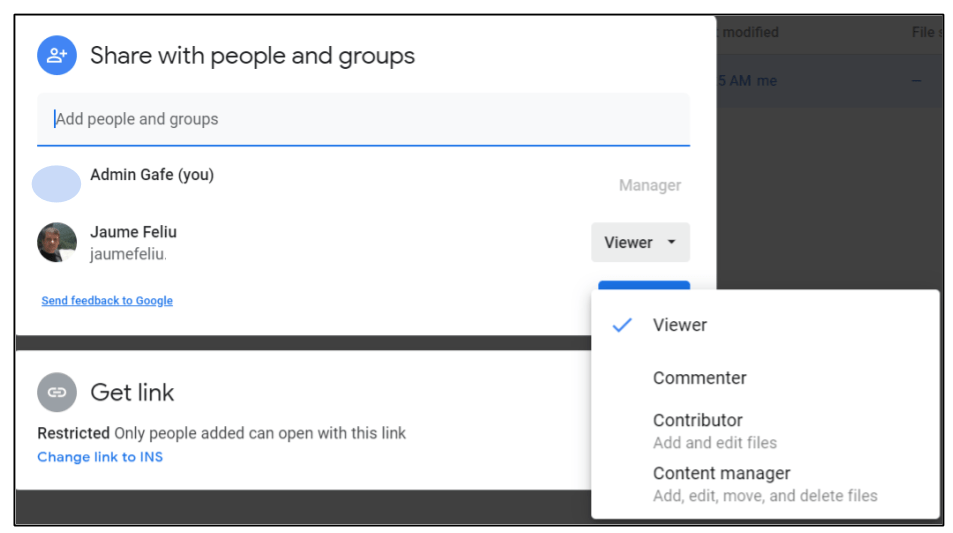
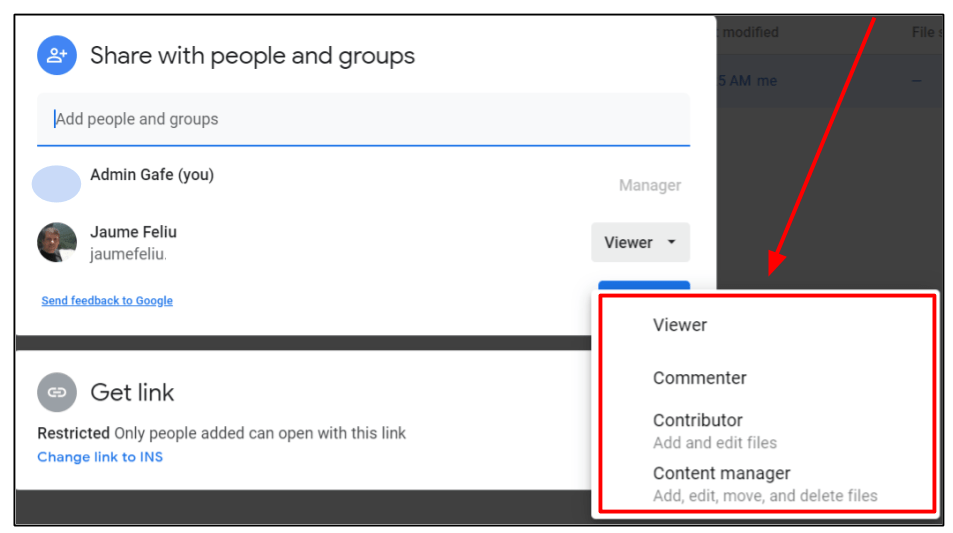
These permissions can be changed. We can select any subfolder and change the role of a particular group or a charge user. The role can be changed to Commenter, Contributor and Content Manager. If the group must have written permission, the Contributor role is very interesting, as it can perform all the usual actions, but it cannot delete files.
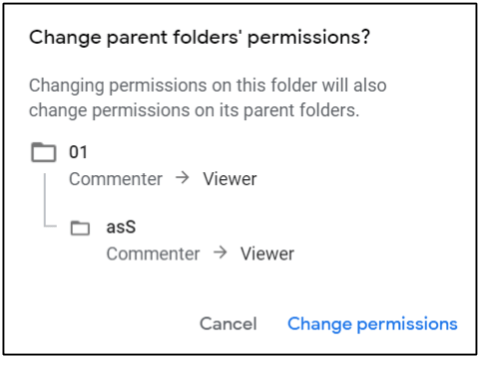
ATTENTION: when we change the role of a position user or a group in a folder or subfolder and we give them more permissions, this role is transmitted to all the subfolders and files inside it. And that cannot be changed. The user or group has a role in a given folder. If we give him more privileges in a subfolder, from there on he will have those privileges in all the following subfolders and files.
And if we try to change the permissions of a file or folder to add permissions when the top folder does not have them, a message will appear indicating that the top folders will also be changed.
Therefore we have to think carefully about from which level, the user or group should have Contributor permissions. From that level on, he will have them in all the sub-levels.
Fifth step: Permit changes
If we have followed this structure, when someone changes positions or responsibilities, or when new teachers arrive or leave, no permission from the structure needs to be changed. By adding users to groups or deleting them we will be giving permissions to the corresponding folders.
And if the person who changes is a position, all you have to do is change the password and pass on the user of the position to the new person.
Let’s finish: how do you go from a structure with shared folders to one with a shared drive?
The truth is that, as with many changes, the task is not easy. The administrator can enter the shared folder, select all the folders and drag them to the Shared Drive. Depending on the number of folders and files, this process can take a long time (even hours). So much for the easy part.
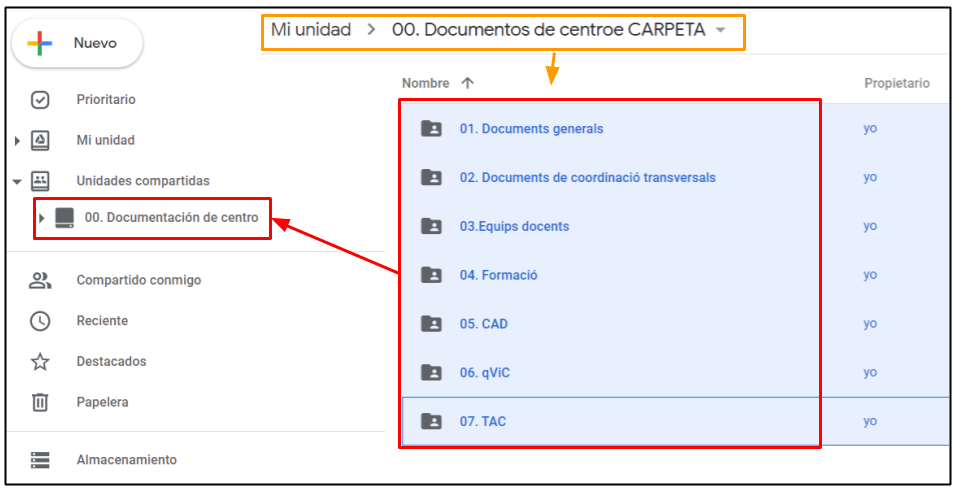
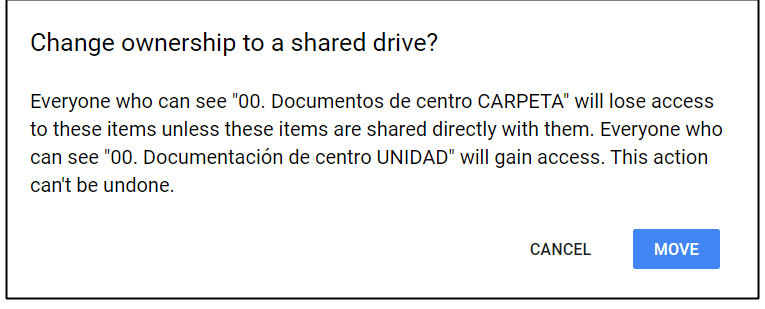
What is the problem? By dragging it, it already warns us: the permissions are not being copied.
Therefore, you will have to go folder by folder to add the necessary permissions to each group or each user in charge. This makes it necessary to think well about when we have to make the change.
If we are a centre that is starting to organize the structure, it is much better to start with shared units. If you are a centre where you already have a complex structure with many permissions, you may have to wait to make the change at some point with little teaching load. In any case, you have to keep this in mind and plan for it.
